Use Case:
For this demonstration, we are going to dynamically generate PDF content inside our ETL job. We are going to extract all our Account records from SFDC and dynamically generate PDF content from the fields on the Account records. We will then inser that data into an Attachment record for each of the Accounts as a PDF document created using iText.
Step 1 - Create Your Salesforce.com Metadata Connection
The first step is to create your connection for SFDC metadata. I have a video on YouTube which shows you how can do this. For this example you will want to pull in the Accounts and Attachements objects from SFDC. After following the instructions in the video for creating your SFDC metadata connections you should have them in your repository like figure below.Step 2 - Download iText PDF Library
You will need the iText PDF library for the portions of the ETL job which will generate dynamic PDF content. You will also need to add the iText jar file to you java build path. You can do this by using the User Libraries feature as shown below:
Talend -> Preferences -> Java -> Build Path -> User Libraries
Step 3 - Create a new Job Design and Load Java Libraries
Talend allows you to load external Java libraries into your job which can have code executed inside your job. The component to load external Java libraries is called tLibraryLoad. You should use this component as one of the first steps in your job to load the any dependent jars you need. In this case, we are going to load the iText PDF library, as well as Apache Commons Codec so that we can Base64 encode our Attachment file content (more on that later).
Using tLibraryLoad component to load Java jar files.
Step 4 - Query SFDC Account Records
This step we simply use the tSalesforceInput component to read Accounts. For details you can see the video above on how to the Account records.Step 4 - Create the Account Record PDF using tJavaRow
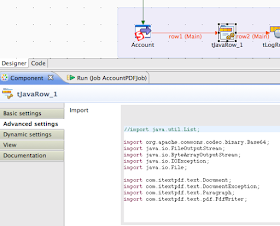
The tJavaRow component is a very powerful component. It allows you to code functionality into your ETL job using Java. In this example we are using the iText PDF Library to generate a simple PDF. The thing to remember about tJavaRow is that the code will execute for each record in the input step.When you add and connect your tJavaRow component to the tSalesforceInput component, the first thing you need to do is click on the Advanced Settings tab and add any import for libraries that you need. These classes should reside in the jars you loaded in the previous step inside tLibraryLoad component.
Import Libraries for iText and Apache Commons Codec
Auto Code Generation and Column Sync
Add Fields to the Mapping for the Content and File Name
The Salesforce API's use Base64 Strings to encode and pass file content. That is the reason we need to use Apache Commons in our job, to convert the PDF bytes into a format that SFDC and ingest. Using the output and input variable in the code, we can generate a PDF using the simple iText PDF objects. Here is the complete code. All this code goes inside the tJavaRow component.
//Code generated according to input schema and output schema
output_row.Id = input_row.Id;
output_row.IsDeleted = input_row.IsDeleted;
output_row.MasterRecordId = input_row.MasterRecordId;
output_row.Name = input_row.Name;
output_row.Type = input_row.Type;
output_row.ParentId = input_row.ParentId;
output_row.BillingStreet = input_row.BillingStreet;
output_row.BillingCity = input_row.BillingCity;
output_row.BillingState = input_row.BillingState;
output_row.BillingPostalCode = input_row.BillingPostalCode;
output_row.BillingCountry = input_row.BillingCountry;
output_row.ShippingStreet = input_row.ShippingStreet;
output_row.ShippingCity = input_row.ShippingCity;
output_row.ShippingState = input_row.ShippingState;
output_row.ShippingPostalCode = input_row.ShippingPostalCode;
output_row.ShippingCountry = input_row.ShippingCountry;
output_row.Phone = input_row.Phone;
output_row.Fax = input_row.Fax;
output_row.AccountNumber = input_row.AccountNumber;
output_row.Website = input_row.Website;
output_row.Sic = input_row.Sic;
output_row.Industry = input_row.Industry;
output_row.AnnualRevenue = input_row.AnnualRevenue;
output_row.NumberOfEmployees = input_row.NumberOfEmployees;
output_row.Ownership = input_row.Ownership;
output_row.TickerSymbol = input_row.TickerSymbol;
output_row.Description = input_row.Description;
output_row.Rating = input_row.Rating;
output_row.Site = input_row.Site;
output_row.OwnerId = input_row.OwnerId;
output_row.CreatedDate = input_row.CreatedDate;
output_row.CreatedById = input_row.CreatedById;
output_row.LastModifiedDate = input_row.LastModifiedDate;
output_row.LastModifiedById = input_row.LastModifiedById;
output_row.SystemModstamp = input_row.SystemModstamp;
output_row.LastActivityDate = input_row.LastActivityDate;
output_row.CustomerPriority__c = input_row.CustomerPriority__c;
output_row.SLA__c = input_row.SLA__c;
output_row.Active__c = input_row.Active__c;
output_row.NumberofLocations__c = input_row.NumberofLocations__c;
output_row.UpsellOpportunity__c = input_row.UpsellOpportunity__c;
output_row.SLASerialNumber__c = input_row.SLASerialNumber__c;
output_row.SLAExpirationDate__c = input_row.SLAExpirationDate__c;
output_row.Location__Latitude__s = input_row.Location__Latitude__s;
output_row.Location__Longitude__s = input_row.Location__Longitude__s;
//CREATE PDF CODE - FROM ITEXT PDF EXAMPLE
ByteArrayOutputStream bos = new ByteArrayOutputStream();
Document document = new Document();
// step 2
PdfWriter.getInstance(document, bos);
// step 3
document.open();
// step 4
document.add(new Paragraph("Account Name: " + output_row.Name + "/nAccountID: " + output_row.Id));
// step 5
document.close();
byte[] bytes = bos.toByteArray();
String stringToStore = new String(Base64.encodeBase64String(bytes));
output_row.Content_Body = stringToStore;
output_row.FileName = input_row.Name + ".pdf";
Step 5 - Insert the PDF into the Attachment Record
Finally we pass along the values using a tMap component and the tSalesforceOutput component for Attachments. We map the output row fields from the tJavaRow onto our tSalesforceOutput row.
tMap Component
The complete demo job looks like this:
Step 6 - Export the Job and Run
The last step is exporting the job and running it on your machine. If you export the job design as a zip, you can get to the AccountPDFJob.sh file which executes the job. This video shows it running and you can see the final generate PDF attachment in SFDC.
I hope this helps folks. There are a lot of uses for this. You could generate PDF documents out of SFDC for all sorts of things with this approach. You could build a job that merges your SFDC data with an ERP and create a PDF invoice for example. Or you could use the Chatter objects and post files to a persons Chatter feed. There are lots of scenarios.


